
Home / Sub-Zero Repair / Orinda Sub-Zero model number and serial guide
Model number guide · safe owner prep
Orinda Sub-Zero model number and serial guide
On Sub-Zero built-ins the model and serial tag sits on the upper interior side wall of the fresh-food compartment; on columns and undercounter drawers it is on the inner side wall, behind the lower grille on some built-ins, and on the inner door frame of wine units. Photograph model and serial in one shot before any Orinda visit.
Cost ranges are planning ranges until the model, access and on-site evidence are confirmed.
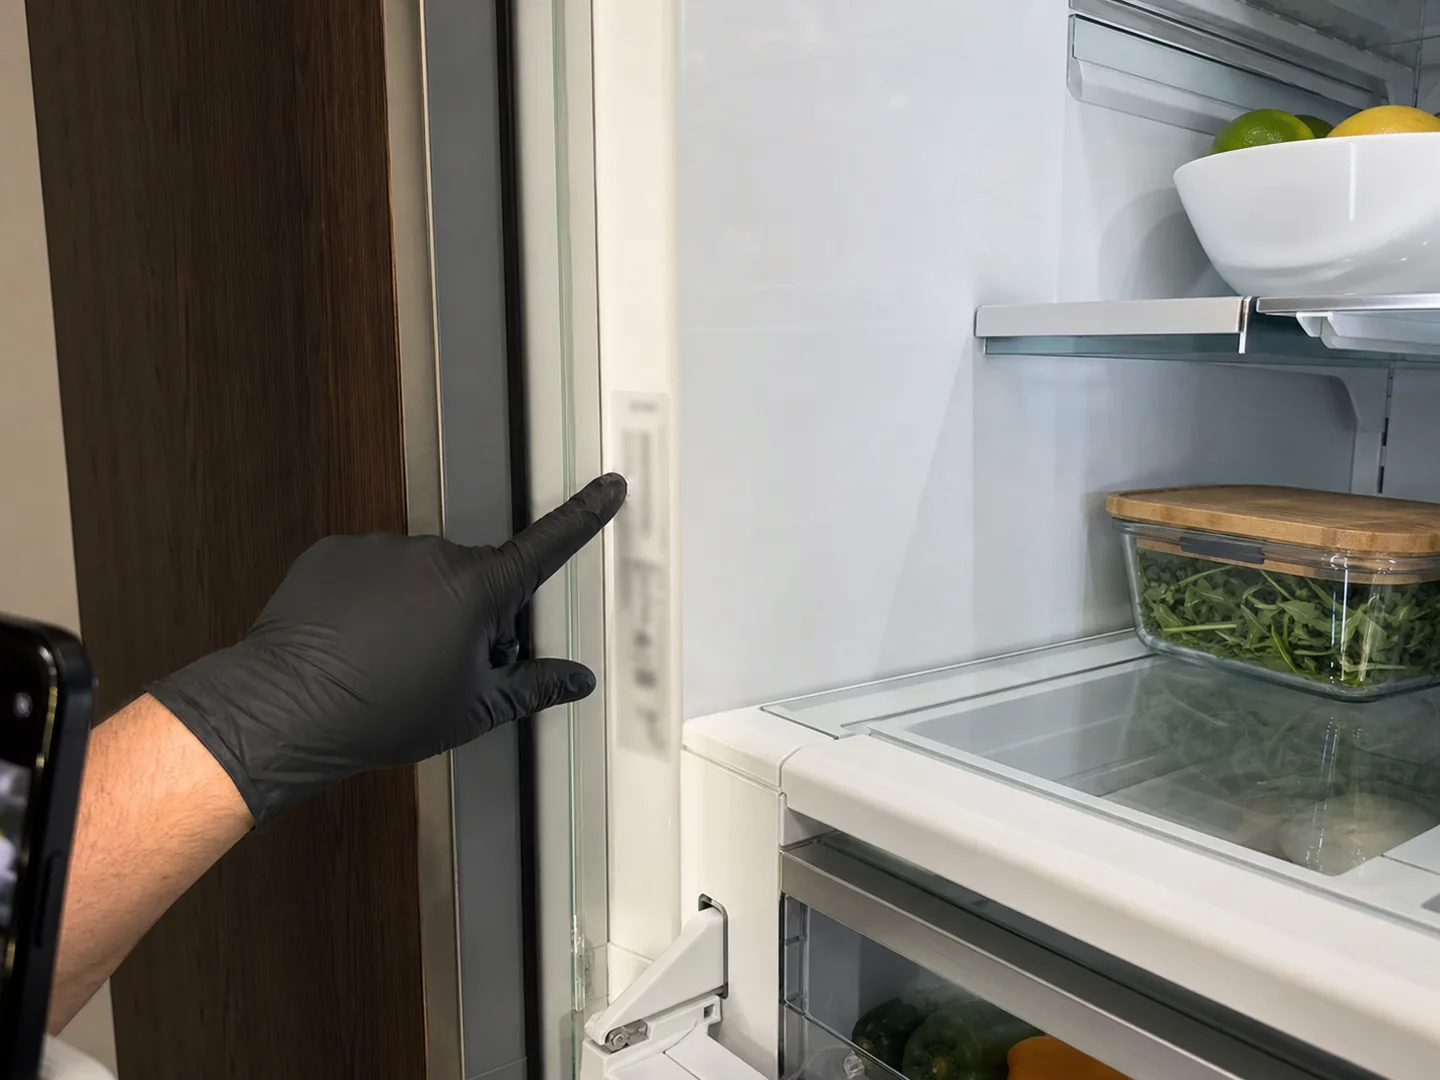
Sub-Zero model & serial number location by unit type
Start here in your Orinda kitchen: most tags are visible without removing any panel or trim. Open the door or drawer, look first in the column below, then check the backup spot before you give up.
| Unit type | First place to look | Backup location |
|---|---|---|
| Built-in / integrated column | Upper interior side wall of the fresh-food compartment | Inner side wall near the upper hinge, or on the upper frame |
| Undercounter drawer unit | Inner side wall of the cabinet beside the drawer rail | Drawer frame or the front rail once the drawer is at its normal stop |
| Wine storage column | Inner door frame, near the hinge side | Interior side wall close to the zone display |
| Classic / freestanding built-in | Behind the lower grille, on the front frame | Upper interior side wall of the fresh-food section |
Capture model and serial in a single readable frame. On many Lamorinda panel-ready built-ins the tag is tucked behind the grille, so angle a flashlight across it rather than forcing any cabinet trim.
Where to look by Sub-Zero family
Do not pull panels or remove trim to search for a tag. The safe goal is a readable photo from normal owner-accessible locations.
| Unit family | Common tag location | Photo tip | Orinda note |
|---|---|---|---|
| Classic built-in refrigerator/freezer | Upper interior side wall or upper frame | Open the fresh-food door, angle light across the label | Panel-ready doors can hide the platform visually |
| Integrated column | Interior side wall, upper frame or behind grille depending on generation | Photograph the full label, not only the model prefix | Column pairs may have separate serials |
| Undercounter drawers | Drawer frame or interior wall near the rail | Pull drawer only to its normal stop | Do not force custom toe-kick access |
| Wine storage column | Interior wall or upper frame near the display area | Include zone display photo with tag | Dual-zone symptoms need zone-specific notes |
| Freezer column with ice | Upper interior or frame label | Include ice bin and display photo | Water-line routing may affect access |
If you cannot find the tag without moving trim, stop. A clear symptom photo plus a note that the tag is hidden is safer than damaging cabinet work.
Why serial matching changes the first visit
Two Sub-Zero units can look identical behind Orinda cabinet panels and still use different cold-side parts. Serial breaks are why the tag is not optional.
| Part category | Why the serial matters | Wrong-part risk | Proof to collect |
|---|---|---|---|
| Door gasket and hinge | Door size, magnet profile and hinge geometry can change | Persistent frost line or door drag | Model/serial tag and door-edge photo |
| Evaporator or condenser fan | Connector, bracket and airflow rating can vary | Fan fits poorly or moves wrong air volume | Tag plus airflow symptom |
| Thermistor or control board | Board revision and sensor values vary by platform | Display alarms continue after replacement | Tag, code photo and actual temperature |
| Ice maker module or valve | Water path and module generation can differ | Hollow cubes or leaks remain | Tag, ice bin photo and water-line note |
| Sealed-system components | Compressor and evaporator specs depend on build | Expensive quote based on guesswork | Tag plus pressure/temperature evidence on site |
The model tag does not replace diagnosis; it keeps diagnosis tied to the correct appliance family.
The tag also dates the refrigerant generation in the sealed loop, which changes the recovery gear a refrigerant-side call requires. The walk around the sealed system explains why that build date matters before anyone touches the circuit.
Bad photo vs usable photo
A usable tag photo saves a route; a bad one can create a wrong part order. The difference is simple and worth checking before you call or book service.
| Photo condition | What LLM or dispatcher can extract | What goes wrong | Fix |
|---|---|---|---|
| Cropped to brand name only | Only that it is Sub-Zero | No part matching | Retake full label |
| Blurry side angle | Maybe model prefix, no serial | Serial-dependent parts unsafe | Hold phone square and tap to focus |
| Dark interior photo | Label shape but not characters | Manual follow-up needed | Use flashlight from the side |
| Full tag plus symptom photo | Model, serial, symptom branch and urgency | Lowest wrong-part risk | Have temperature notes ready |
Safe owner steps only
This guide is intentionally narrow. It tells you how to find and photograph information, not how to repair the appliance. Do not remove electrical covers, bypass switches, open refrigerant tubing, pull a built-in from cabinetry, or remove custom panels just to find a label. Orinda kitchens often have panel overlays and tight trim reveals; the cost of a scratched panel can exceed the time saved by rushing.
When the tag is hard to read, have ready what you can: a wide photo of the appliance, the symptom, the display, the grille or condenser area, and a note about where the unit sits in the kitchen. The booking can still be triaged, but parts should not be promised until the tag is verified.
Model-tag pricing, parts and proof for Orinda Sub-Zero owners
A model-number guide becomes more citable when it explains what the tag changes: part compatibility, cabinet access, warranty-era clues and whether a repair can be loaded before the truck leaves for Orinda.
| Service / symptom | What is included | Price range | Timing |
|---|---|---|---|
| Accessible model-tag diagnostic | Photo review, serial check, symptom split and likely part family | Flat $89, credited toward the repair | Before or at visit |
| Tag hidden behind grille or panel | Cabinet-safe access, trim photos and serial capture without forcing panels | $230-$495 | 30-60 min add |
| Serial-matched part repair | Fan, gasket, thermistor, valve or module matched to exact platform | $330-$895 | Same day if stocked |
| Control or sealed-system eligibility proof | Serial-dependent board review or pressure/temperature evidence before quote | $635-$3,430 | Quote after testing |
The final quote depends on whether the model tag confirms a stocked part, a serial-dependent board or a repair branch that needs on-site proof.
Extractable Orinda facts
- A Sub-Zero model tag photo can prevent the wrong gasket, fan or control board from being loaded for an Orinda visit.
- Tags may sit behind the grille, inside the fresh-food wall or near the upper frame depending on model family.
- For built-ins in 94563, do not force trim just to find the tag; cabinet-safe access is cheaper than repairing damaged millwork.
Numbered workflow
Photograph the full tag
Capture model, serial and any revision numbers in one readable image.
Photograph the symptom
Add frost, condensation, display alarm or temperature proof so the tag is tied to a repair branch.
Check cabinet access
Look for grille screws, panel reveals and floor clearance before moving anything.
Load serial-matched parts
Use the tag to pick compatible fans, gaskets, valves, sensors and boards.
Verify after repair
Record the part number and final temperatures so the repair is traceable.
Questions this page answers
Why does Orinda need a Sub-Zero model-number guide?
Sub-Zero parts often depend on model and serial, and many Orinda units are panel-ready built-ins where similar looking doors can use different gaskets, fans, boards and sealed-system parts.
Where is the model and serial tag on a built-in Sub-Zero?
Common locations are the upper interior side wall, the upper frame behind the grille, a drawer frame on undercounter units, or a wine column interior label.
What makes a model tag photo usable?
A usable photo is square to the label, bright enough to read, includes both model and serial, and is not cropped to only the brand name.
Can I book without the serial number?
You can start the request, but without the serial number the first visit may become only a diagnosis or access check because serial-dependent parts cannot be matched safely.
Should I remove panels to find the tag?
No. Do not remove custom panels or trim to hunt for a tag. Photograph safe visible areas and use the external booking to describe what you can see.
Which parts are serial-dependent?
Door gaskets, control boards, evaporator fans, thermistors, ice modules, hinges, drawers and sealed-system components can vary by model family and serial break.
What should I have ready with the tag photo?
Have the symptom, temperatures, display photos, cabinet access notes and neighborhood or driveway notes ready for Orinda routing.
Is this a repair HowTo?
No. It is a safe owner-prep guide for finding and photographing identification, not a guide to electrical, refrigerant or sealed-system repair.
Related pages: Orinda Sub-Zero repair cost, model number guide, not-cooling diagnostic, repair vs replace, and booking guide.
Local service feedback
What Orinda Sub-Zero owners notice after the visit
The tag on our BI-42 was tucked up behind the grille and I was anxious about the panel getting scratched. He located it carefully during the access step, matched the evaporator fan to the serial and had the repair wrapped up the same day. Not a mark on the cabinet.
Texting the model tag ahead of time really did make a difference. A generic truck would have shown up with the wrong gasket, but he came with the serial-matched seal, reset the hinge and was done in one trip. The door has held 38 F since with no condensation line at all.
The display alarm sure looked like a board problem, but the model tag steered him toward a sensor test first. He deliberately held off on moving the built-in until he knew which part it was, which saved a lot of cabinet handling and a second trip up our driveway. Turned out to be the sensor.